Skip to content

HOW IT WORKS

From install to Git-ready automation.

A getting-started guide with two ways to start — keep testing the way you already do, or import OpenAPI — then one shared path through generation, execution, reporting and Git. For the full product tour visit Product. For capability depth visit Features.

Journey

From install to collaboration — with two ways to start.

  1. Install

    Studio and extension ready.

  2. Create project

    Workspace and project home.

  3. Configure

    Environment and credentials.

  4. Choose source

    Test normally or import OpenAPI.

  5. Generate

    Shared automation pipeline.

  6. Execute

    Run locally and review.

  7. Analyse

    Coverage and release reports.

  8. Git

    Version and collaborate.

Setup steps

Step 1

Install Flow²Test

Download the Windows installer, launch Studio, install the Chrome extension, connect the local recorder and create a Workspace.

Expected outcome: Studio is ready to create projects and capture or import APIs.

Next: create your automation project.

Setup checklist

No invented installer screens

  • Download installer
  • Launch Studio
  • Install Chrome extension
  • Connect local recorder
  • Create Workspace

Step 2

Create your project

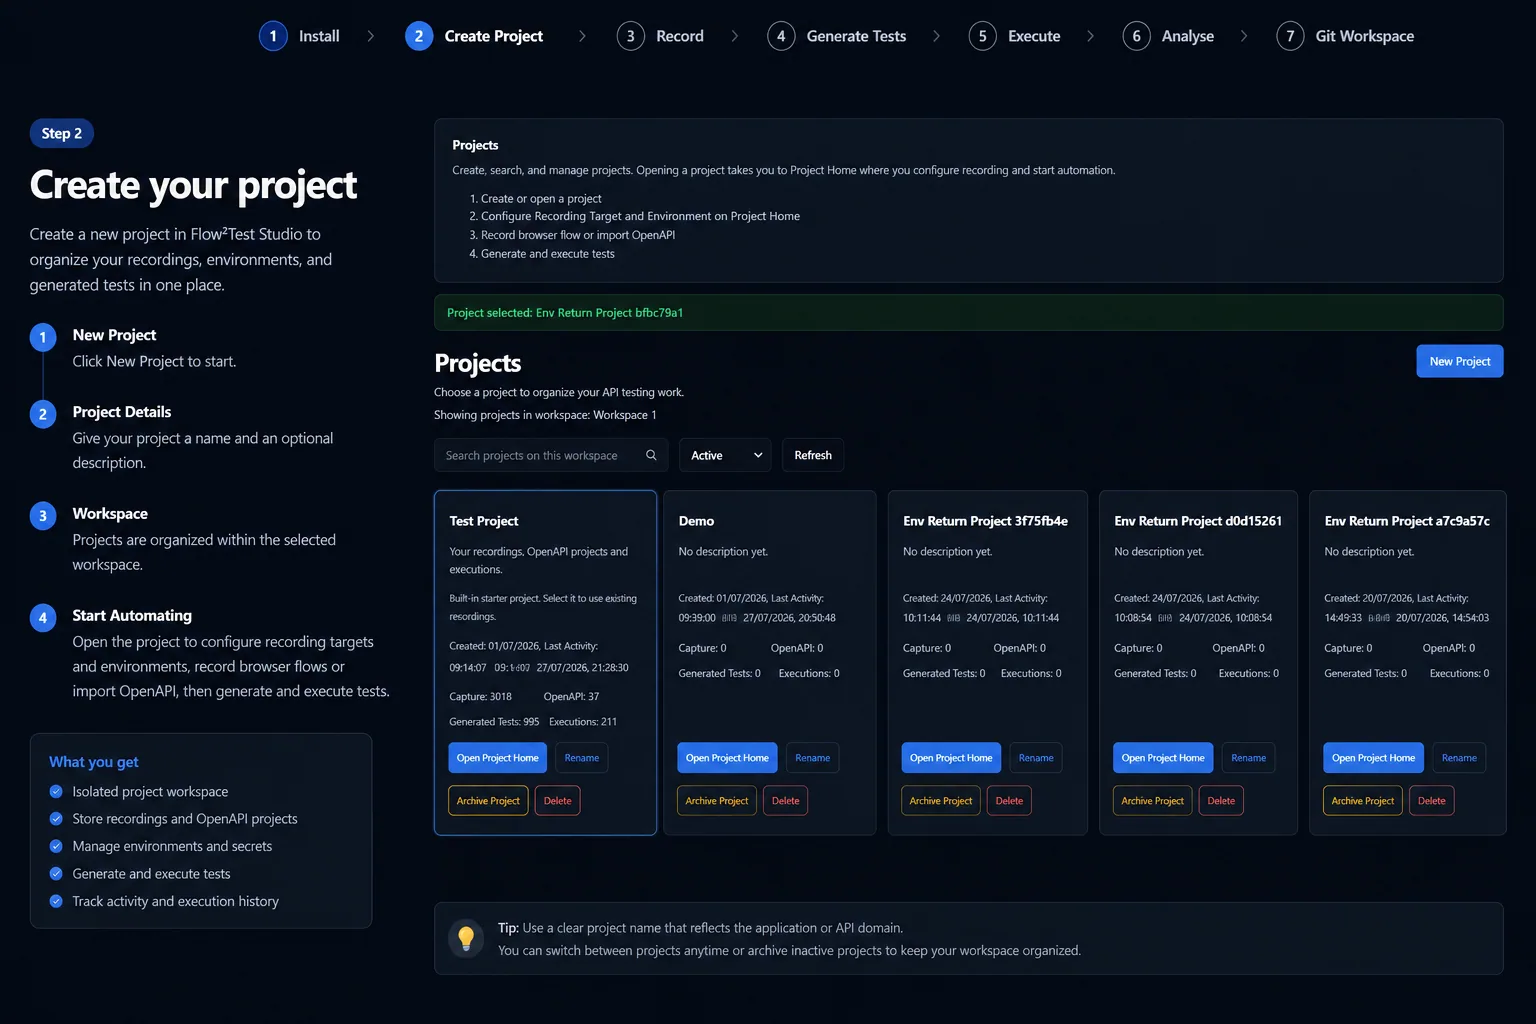
Create a new project, select or create a Workspace, open Project Home, configure the recording target and assign an environment so the project is ready for browser recording or OpenAPI import.

Expected outcome: A project is ready for either automation entry path.

Next: configure the environment.
Flow²Test Project Management showing Workspace projects ready for recording and OpenAPI import.
Project Management — Create and open automation projects

Step 3

Configure the environment

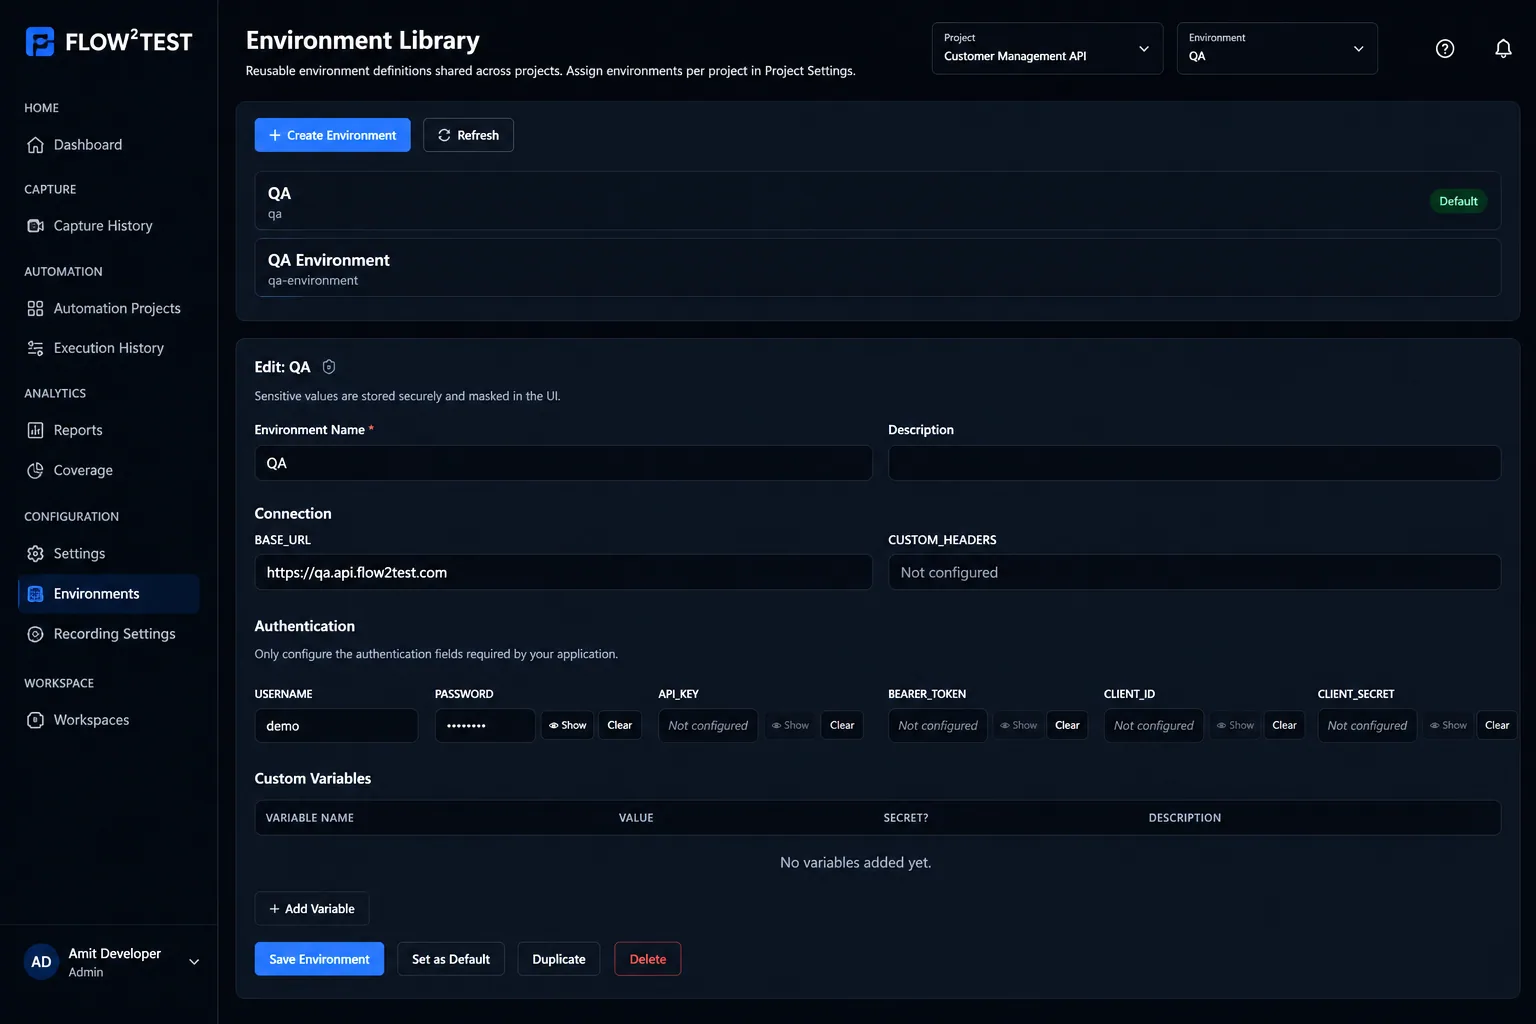
Assign a reusable environment, set the base URL and prepare QA credentials. Values stay local and can be masked in Studio.

Expected outcome: Recording, import and execution share a named environment.

Next: choose how you want to start.
Flow²Test Environment Library showing QA environment configuration and masked authentication values.
Environment Library — Local environment and secret management

Step 4

Choose how you want to start.

Flow²Test supports both real browser recording and OpenAPI-first automation. Choose the workflow that best matches your project. Both approaches generate the same dependency-aware automation and continue through the same execution, reporting and collaboration pipeline.

Path A

Convert real user flows into automated API tests

Continue testing the way you already do. Flow²Test builds the API automation in the background.

  1. 1

    Perform your normal application testing.

    Log in, search, create records, update data and complete your business flow exactly as you do today. Do not change your testing process.

  2. 2

    Flow²Test records every API request in the background.

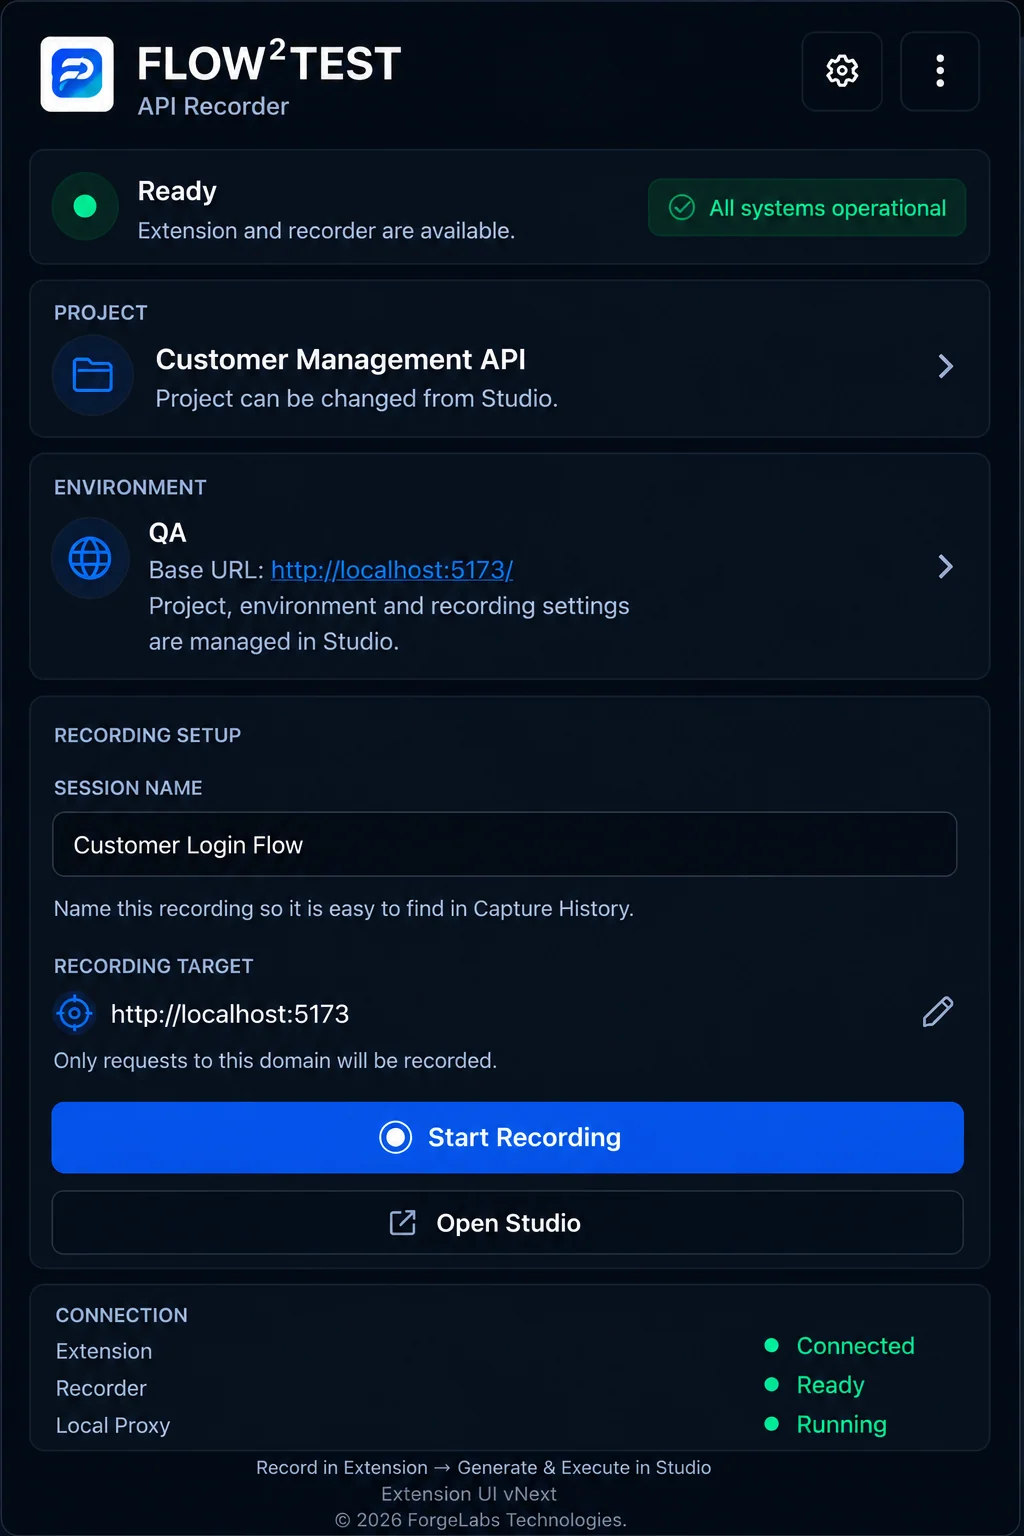
    Simply start recording from the Flow²Test Chrome Extension. While you perform your normal testing, Flow²Test quietly captures the complete API conversation without interrupting your workflow.

    • No manual request capture
    • No switching between tools
    • No changes to your testing process
  3. 3

    Stop recording when your test scenario is complete.

    Once you've finished validating the business flow, stop the recording and continue in Flow²Test Studio.

  4. 4

    Flow²Test automatically analyses the recorded flow.

    The platform automatically detects authentication, identifies request dependencies, links dynamic IDs, resolves request sequencing and maps reusable variables. No manual dependency configuration is required for standard scenarios.

  5. 5

    Production-ready API tests are generated automatically.

    Flow²Test generates executable REST Assured automation together with Postman collections and reusable environment references, ready for execution and further integration into your existing development workflow.

You focus on testing. Flow²Test focuses on automation.

Continue performing your regular functional testing while Flow²Test transforms the captured API traffic into maintainable automated API tests.

Flow²Test API Recorder configured to capture the Customer Login Flow for the Customer Management API project.
API Recorder — Capture authenticated browser traffic

Path B

OpenAPI Import

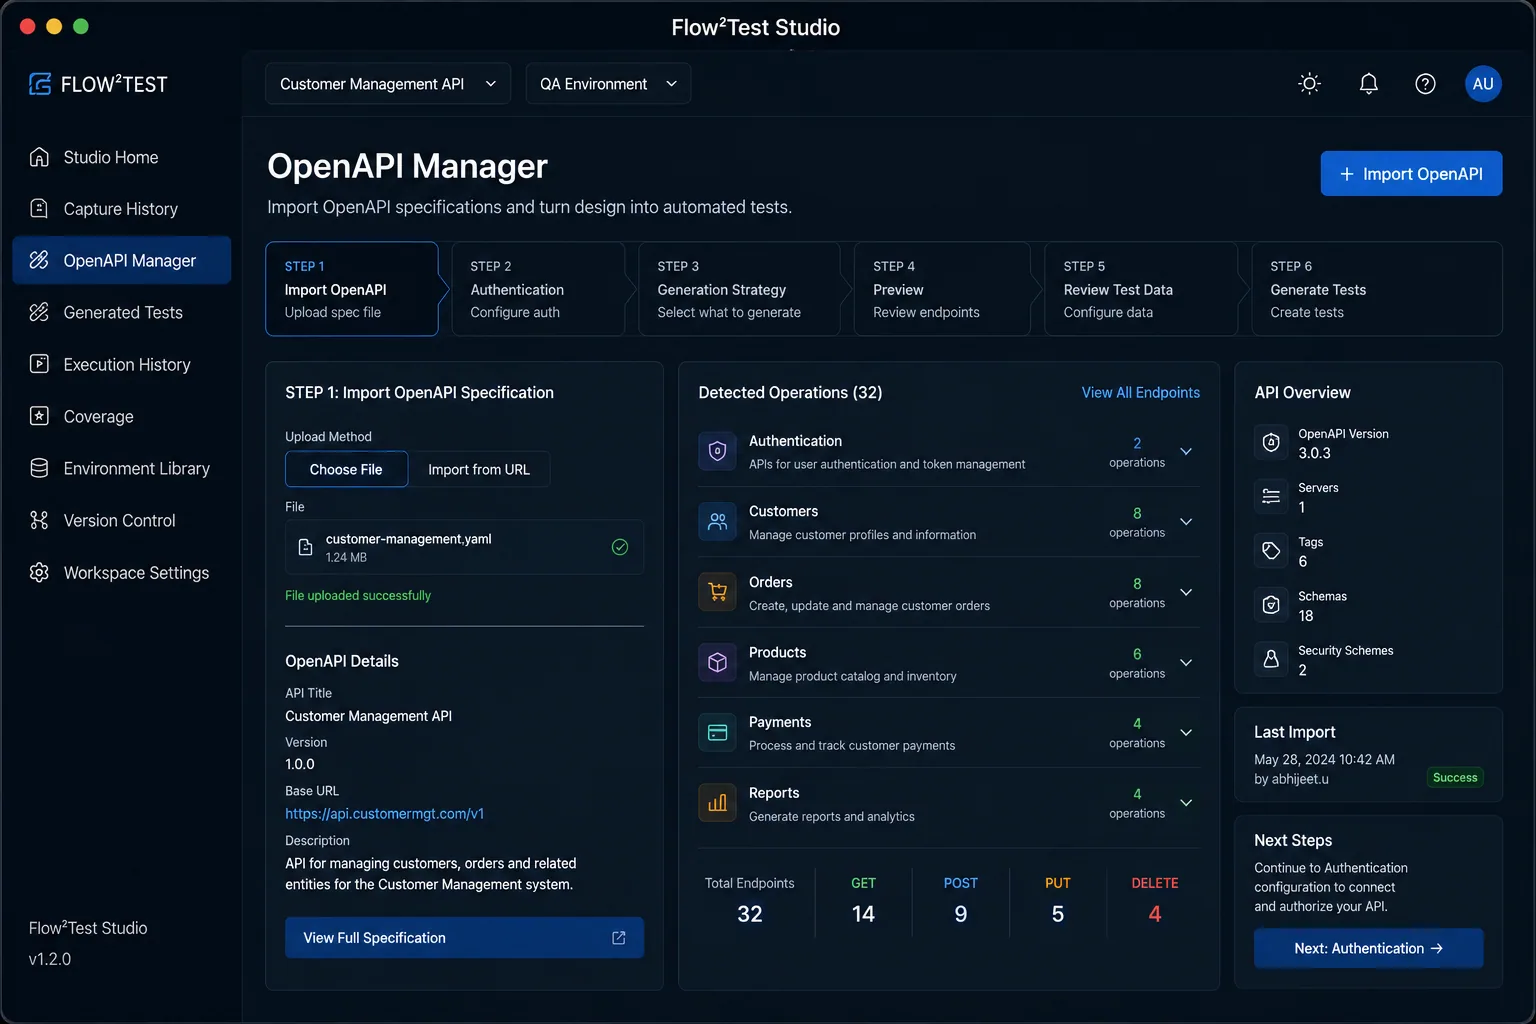
Import a specification from file or URL, configure authentication, preview operations and generate an automation project.

  1. 1Import from File or URL
  2. 2Configure authentication
  3. 3Preview operations
  4. 4Generate automation project

Expected outcome: An OpenAPI-backed project is ready for the shared pipeline.

Flow²Test OpenAPI Manager showing an imported Customer Management API specification and detected operations.
OpenAPI Manager — Guided specification-to-test workflow

Both paths continue to Generate Tests

Continue to Generate Tests

Shared pipeline after recording or OpenAPI import

Step 5

Generate tests

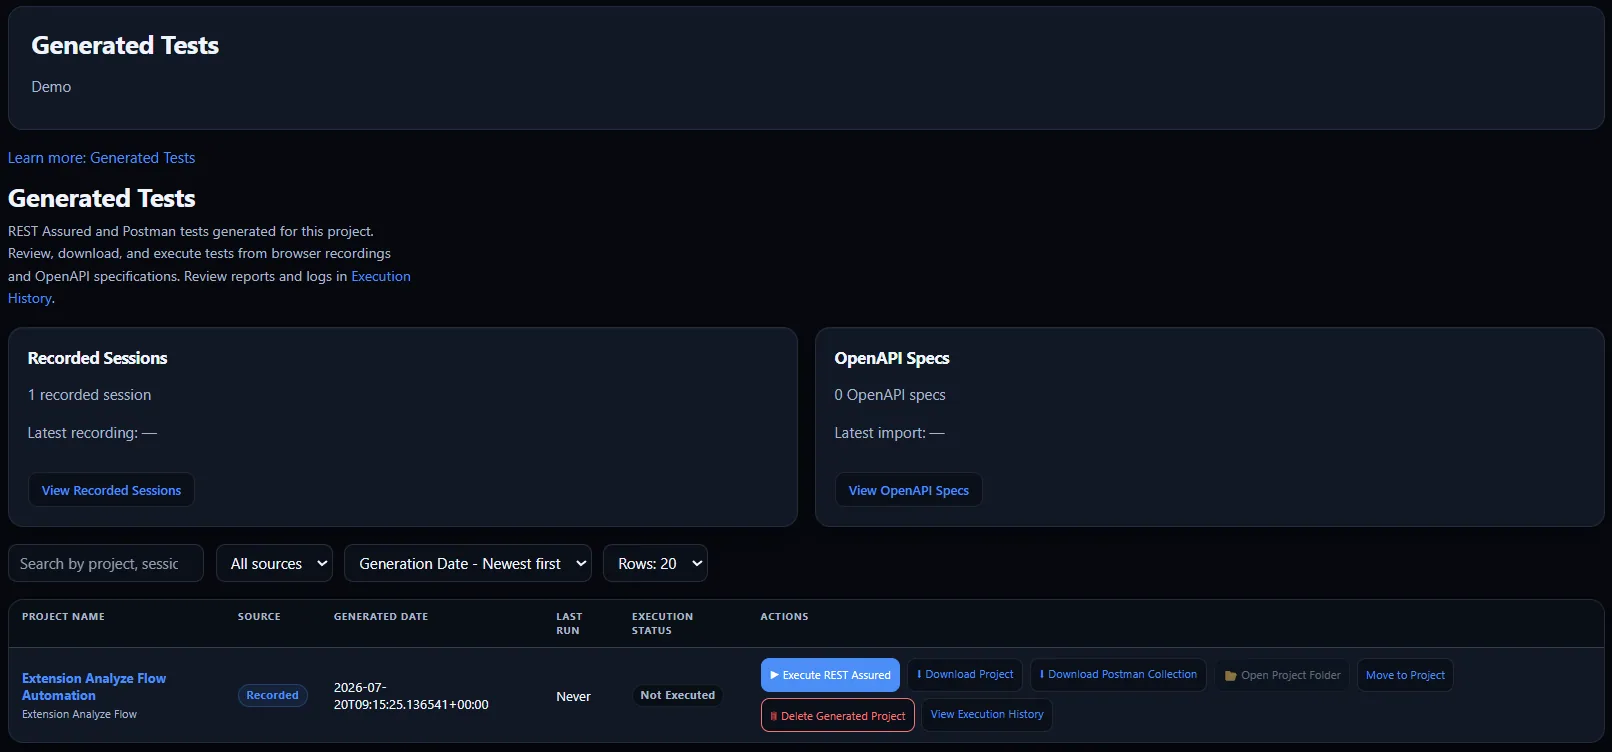
Whether you converted a real user flow or imported OpenAPI, generate a dependency-aware REST Assured project with JUnit 5 and optional Postman export. Download the project and continue in your IDE — Studio does not embed a code editor.

Expected outcome: An executable project you own is ready.

Next: execute locally.
Flow²Test Generated Tests page showing REST Assured execution and project-download actions.
Generated Tests — Execute or download generated automation

Step 6

Execute locally

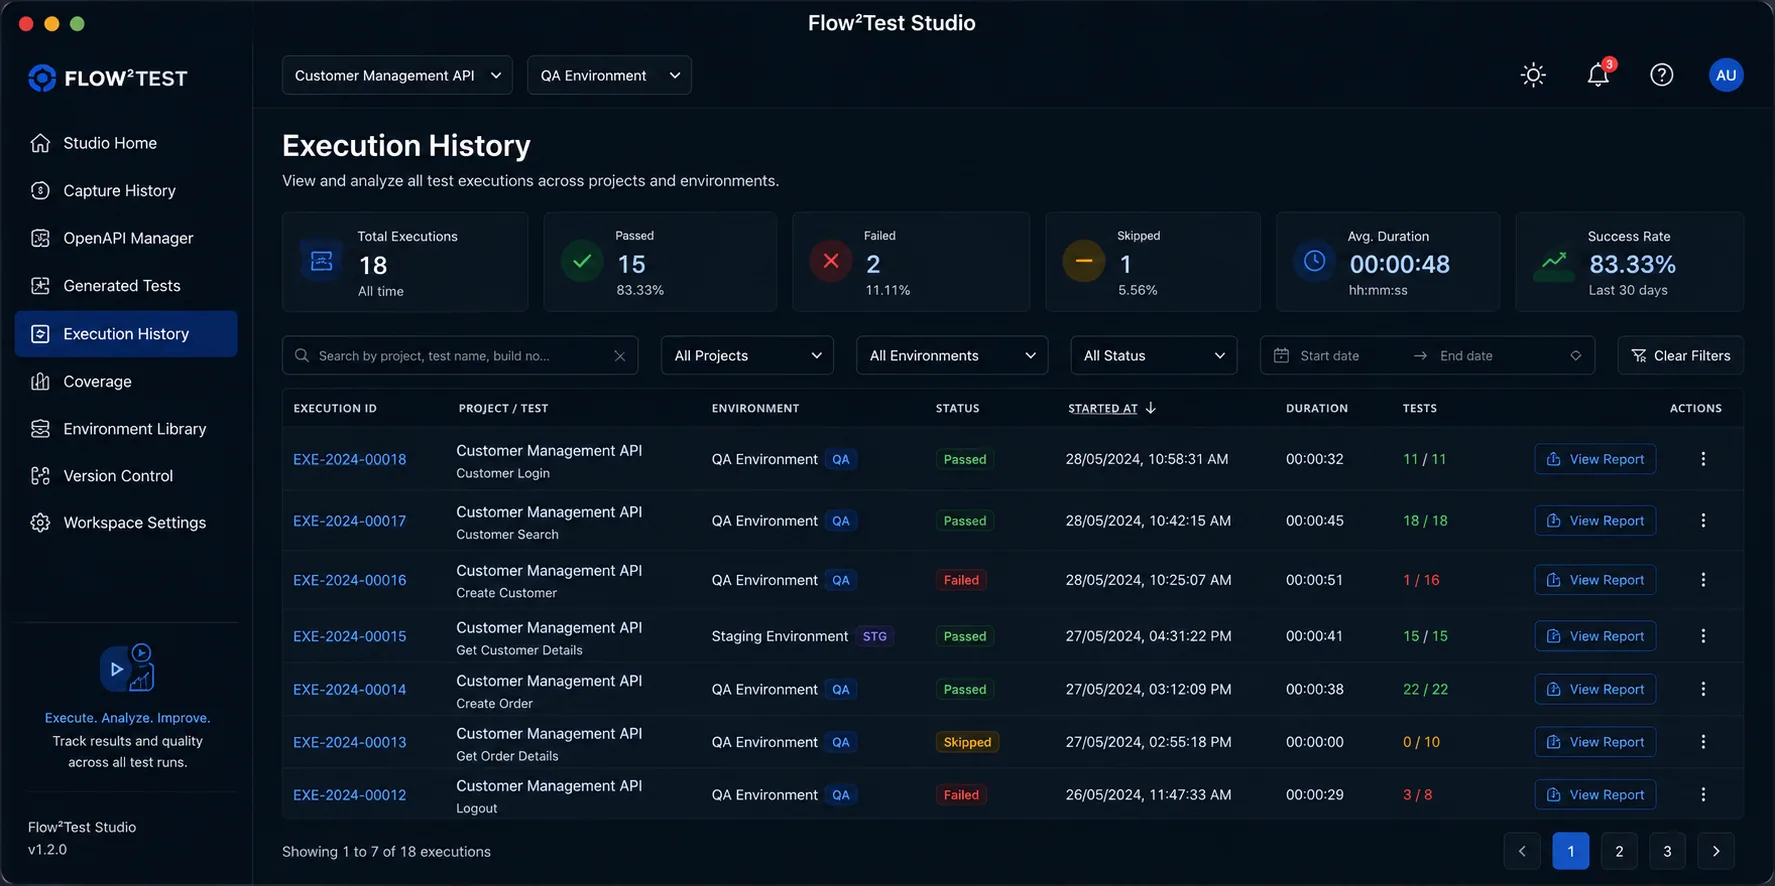
Choose the environment, run REST Assured tests on your machine and review reports, logs and replay diagnostics in Execution History.

Expected outcome: You have validated run results.

Next: review coverage.
Flow²Test Execution History showing automated test runs and report actions.
Execution History — Reports, reruns and diagnostics

Step 7

Coverage

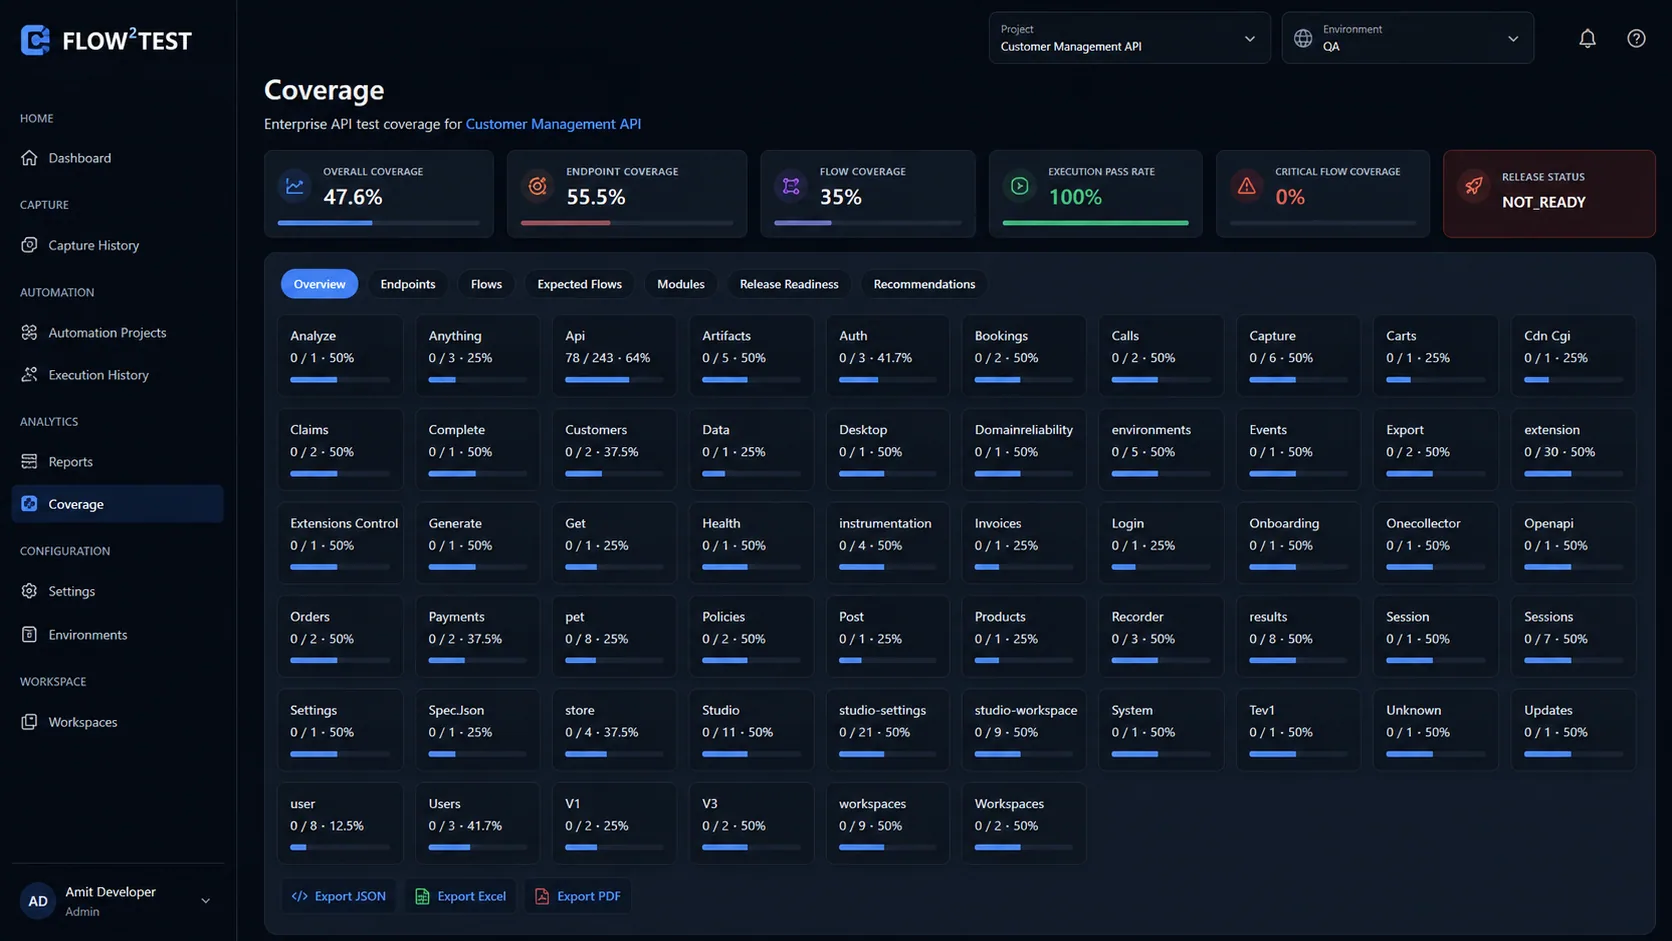
Review endpoint coverage, flow coverage, critical-flow coverage, recommendations and release readiness for the selected project.

Expected outcome: You understand what the suite exercises.

Next: prepare release evidence.
Flow²Test Coverage showing endpoint, flow and release-readiness metrics for the Customer Management API project.
Coverage — Endpoint, flow and release-readiness analysis

Step 8

Release Center

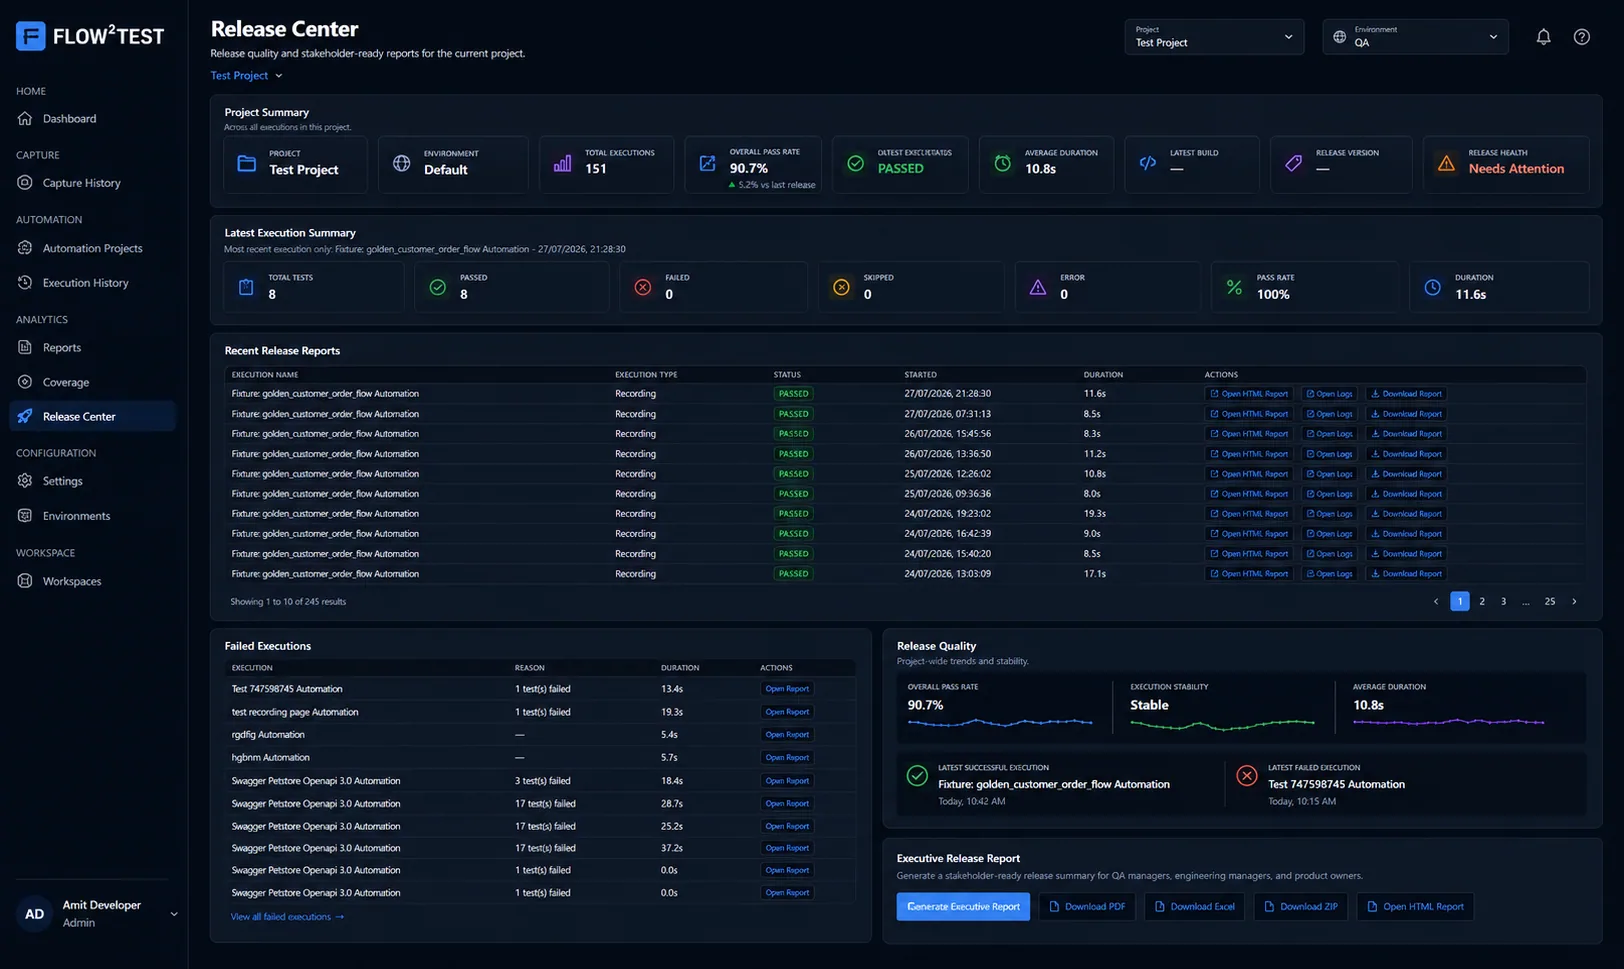
Summarise executions and export stakeholder-ready release reports where supported in Studio.

Expected outcome: Release evidence is ready to share.

Next: version automation in Git.
Flow²Test Release Center showing release quality, execution summaries and executive-report exports.
Release Center — Stakeholder-ready release reporting

Step 9

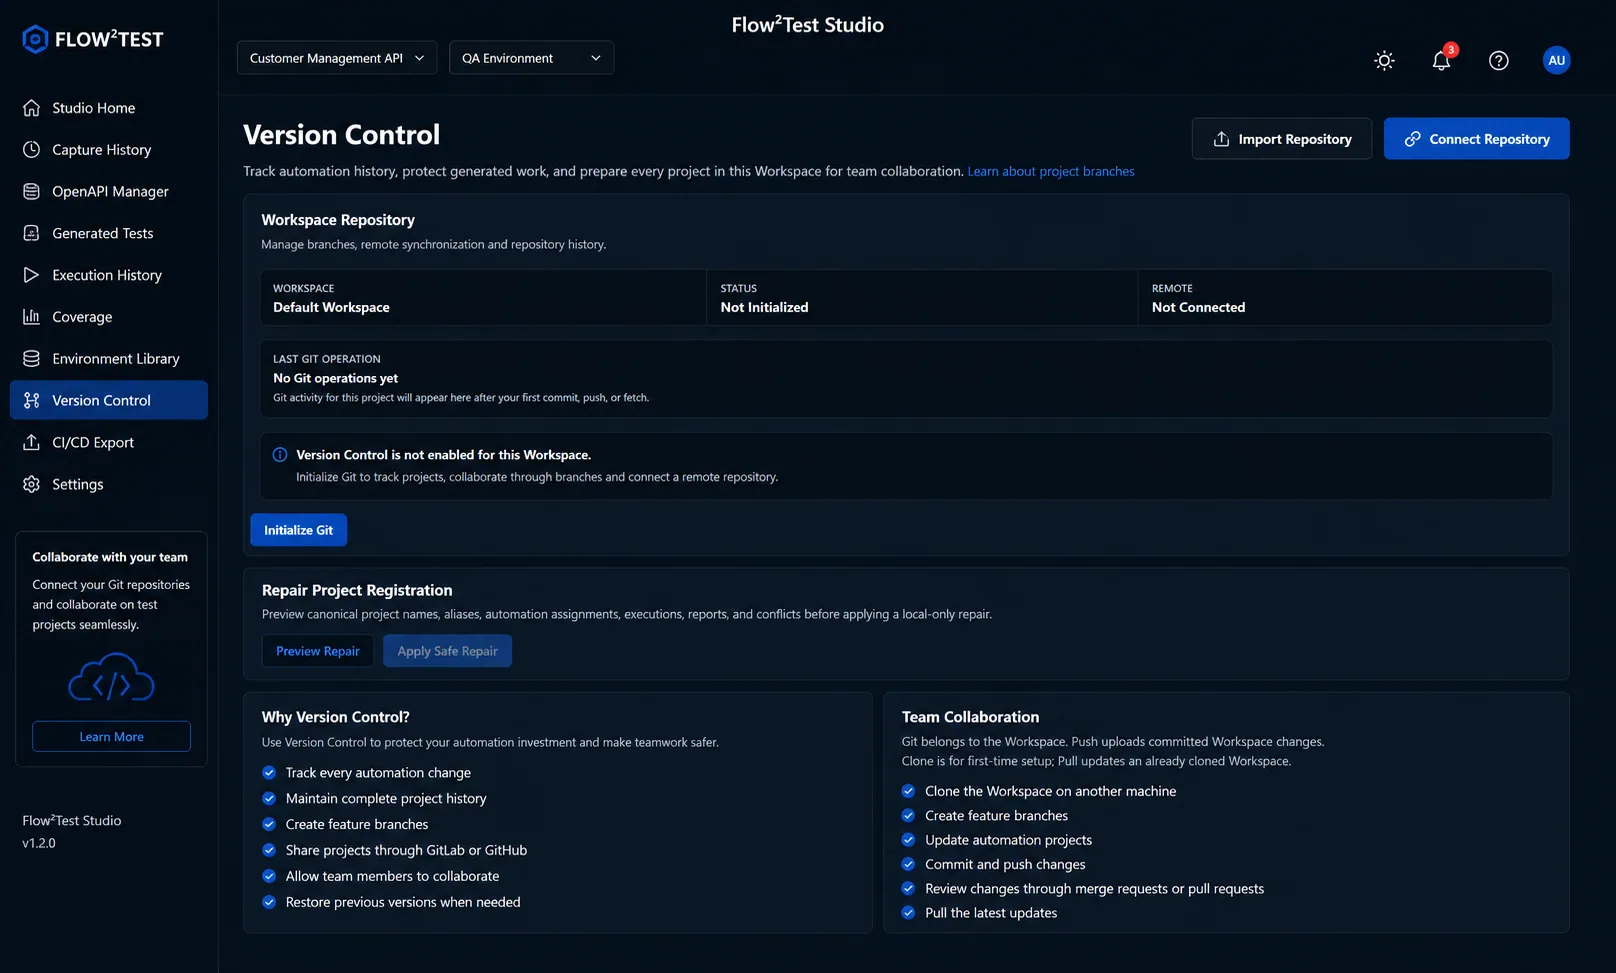
Git Workspace

Initialise Git for the Workspace, then commit, branch, push and pull with GitHub or GitLab. Features appear after initialisation.

Expected outcome: Automation is versioned like application code.

Join Early Access and start with Step 1 when downloads open.
Flow²Test Version Control showing Workspace repository setup and Git collaboration guidance.
Version Control — Git-native Workspace collaboration

Complete path

Install → collaborate.

  1. Completed

    Step 1

    Install

  2. Completed

    Step 2

    Create project

  3. Completed

    Step 3

    Configure

  4. Completed

    Step 4

    Record or convert a user flow

  5. Completed

    Step 5

    Generate

  6. Completed

    Step 6

    Execute

  7. Completed

    Step 7

    Coverage

  8. Completed

    Step 8

    Release

  9. Completed

    Step 9

    Collaborate

Start converting real user flows today.

Join Early Access, keep testing the way you already do, and let Flow²Test build maintainable API automation in the background — or start from OpenAPI when that fits better.